Background 记录一下我第一次复现论文的过程中,遇到的各种问题和整体的步骤。这篇文章主要作为我自己的记录,并温习关于深度学习相关的知识点,一年后回看这些其实是个科研人的基本能力了,但是看到这些东西笔者还是挺怀念的,作为一个纯科研小白入门的第一篇从零复现的论文。
应该会涉及到如下知识点:
一部分论文的解读(一丢丢)
dataset和dataloader怎么实现
model怎么实现,数据如何在forward之间传递的
loss函数有哪些,如何计算损失
如何使用optim优化参数
如何使用tensorboard记录训练过程
关于event-camera和visual-place-recognition(vpr)。这是复现的论文 ,主要用的MVSEC 数据集。
我并没有完全按照原论文的做法,比如并没有使用EST Voxel Grid Representation 层,而是直接用了个函数(即event-stream转voxel-grid的过程是写死的,而非可学习的),计算triplet-loss的时候也只用了最简单的方法。如果有人不幸看到这篇文章,并恰好也在做相关研究准备复现,请谨慎甄别。
Dataset Introduction MVSEC数据集是在不同天气下(分别是day1, day2, night1, night2, night3)用事件相机录制的事件流,即一堆(x, y, p, t),x和y表示光强改变的坐标,p表示方向,t表示时间戳。我们将连续的事件流划分在一起作为一个场景(subject)。
如何将连续的事件流划分为一个个场景是个超参数,按理说是有两种划分方式:
以固定数量的事件流划分
以固定的时间间隔划分
这两种方式应该对结果影响不大,我们让场景总数大致相等,论文中TABLE2表明划分完后,day1和day2的总数大致为11937和28583。这里主要用day2-train和day1-test,因为day2数据多,训练效果好,而night还需要结合两个不同天气的数据,比较麻烦。
试了一下拿15000作为固定数量的事件流划分还算合理,最后得到的数据集目录大致如下:
1
2
3
4
5
6
$ tree -L 1 . ├── 1506117898.9956346.npy ├── 1506117899.8005185.npy ├── ... └── 1506118159.997747.npy
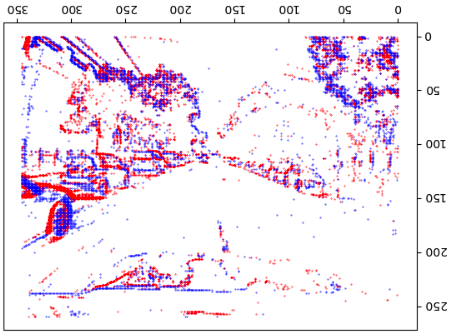
每个npy数据格式是[fixed_length, 4],可以将每个场景可视化看一下,直接把所有事件描在图上就行,注意x和y的范围[x,y]=[346,260]是由采集的事件相机决定的。
1
2
3
4
5
6
7
8
9
10
11
12
13
14
15
16
17
18
19
20
21
import numpy as npimport torch, osimport matplotlib.pyplot as pltroot = "" filenames = ["outdoor_day1" , "outdoor_day2" ] db_path = os.path.join(root, filenames[1 ]) sorted_list_dir = sorted (os.listdir(db_path), key=lambda x: float (os.path.splitext(os.path.basename(x))[0 ])) for event_npy in sorted_list_dir[400 :410 ]: timestamp = float (os.path.splitext(os.path.basename(event_npy))[0 ]) frame = np.zeros((346 , 260 )) events = np.load(os.path.join(db_path, event_npy)) print (timestamp, len (events)) x1 = events[:, 1 ][events[:, 3 ] == 0.0 ] y1 = events[:, 2 ][events[:, 3 ] == 0.0 ] x2 = events[:, 1 ][events[:, 3 ] == 1.0 ] y2 = events[:, 2 ][events[:, 3 ] == 1.0 ] plt.scatter(x1, y1, s=0.1 , c='r' ) plt.scatter(x2, y2, s=0.1 , c='b' ) plt.show()
得到的效果如下,貌似反了,不过没事,这图还是能看出来是在大马路上开的。
Implementation 这里就得提到pytorch的Dataset和Dataloader了,一般先自定义一个类继承torch.utils.data.Dataset,然后实现三个内置函数:
1
2
3
4
5
6
7
8
9
10
11
import torchclass YourDataset (torch.utils.data.Dataset): def __init__ (self, /*自定义的参数*/ ): super ().__init__() self.xxx = xxx def __getitem__ (self, index ): return anchor, pos_env, np.array(neg_envs) def __len__ (self ): return len (self.query)
__init__就是初始化,一般如果是图片,我们会计算出每个图的路径保存给self,获取的时候再去加载;__getitem__是获取单个 数据的方法,参数是index,这时候可以利用先前保存的路径去读取image、加载预处理过的npy文件等等;__len__是获取整个数据集的长度,也是index的取值范围,方便后续dataloader批量读取;
dataset是可以直接取索引的,用的__getitem__方法。
dataset一般得传给dataloader,从而实现以batchsize大小读取。你也可以自定义loader,然后用yield方法:
1
2
3
4
5
6
7
8
9
10
11
12
13
14
15
16
17
18
19
20
21
22
23
24
25
class YourDataLoader : def __init__ (self, dataset, batchsize=1 , device="cuda:0" ): self.device = device self.dataset = dataset self.loader = torch.utils.data.DataLoader( dataset, batch_size=batchsize, num_workers=4 , ) def __iter__ (self ): for data in self.loader: yield data def __len__ (self ): return len (self.loader) if __name__ == "__main__" : train_dataset = YourDataset(xxx) print (dataset[-1 ][0 ], dataset[-1 ][1 ]) train_loader = YourDataLoader(train_dataset, batchsize=4 , device="cuda:0" ) while True : for p in tqdm.tqdm(train_loader): import pdb; pdb.set_trace()
Model 一般Model需要继承nn.Module类,在__init__中定义一些自己的变量,在forward定义数据通过模型的过程。下面的这个Model例子中,输入vox的shape为[4, 5, 260, 346],4是batchsize,[5, 260, 346]是voxel grid的形状,通过上述数据集中的events_to_voxel_grid()函数将事件流转换而来。
1
2
3
4
5
6
7
8
9
10
11
12
13
14
15
16
17
18
19
20
21
22
23
24
25
26
27
28
29
30
31
32
33
34
35
36
class Discriptor (nn.Module): def __init__ (self, voxel_dimension=(5 ,346 ,260 crop_dimension=(224 , 224 mlp_layers=[1 , 30 , 30 , 1 ], activation=nn.LeakyReLU( ): nn.Module.__init__(self) self.voxel_dimension = voxel_dimension self.quantization_layer = QuantizationLayer(voxel_dimension, mlp_layers, activation) self.resnet34 = ResNet34(input_channels=voxel_dimension[0 ]) self.crop_dimension = crop_dimension self.vlad = NetVLAD2(num_clusters=32 , dim=512 ) def crop_and_resize_to_resolution (self, x, output_resolution=(224 , 224 ): B, C, H, W = x.shape if H > W: h = H // 2 x = x[:, :, h - W // 2 :h + W // 2 , :] else : h = W // 2 x = x[:, :, :, h - H // 2 :h + H // 2 ] x = F.interpolate(x, size=output_resolution) return x def forward (self, vox ): vox_cropped = self.crop_and_resize_to_resolution(vox, self.crop_dimension) pred = self.resnet34.forward(vox_cropped.to(dtype=torch.float32)) embedded_x = self.vlad(pred) return embedded_x
也可以在这里面嵌套各个其他的模型,例如resnet34,这是当时改过最后几层的一个resnet34,不过这样改貌似不是最好的方法。
1
2
3
4
5
6
7
8
9
10
11
12
13
14
15
16
17
18
19
20
21
22
23
class ResNet34 (nn.Module): def __init__ (self, input_channels=5 ): super (ResNet34, self).__init__() self.resnet34 = resnet34(weights=ResNet34_Weights.DEFAULT) self.resnet34.conv1 = nn.Conv2d(input_channels, 64 , kernel_size=7 , stride=2 , padding=3 , bias=False ) def forward (self, x ): x = self.resnet34.conv1(x) x = self.resnet34.bn1(x) x = self.resnet34.relu(x) x = self.resnet34.maxpool(x) x = self.resnet34.layer1(x) x = self.resnet34.layer2(x) x = self.resnet34.layer3(x) x = self.resnet34.layer4(x) return x
Loss & Optim 论文中使用的是Triplet Loss,它的计算需要一个**三元组<a, p, n>**:
a, anchor表示训练样本。
p, positive表示预测为正样本。
n, negative表示预测为负样本。
Triplet Loss的目的是减少positive与anchor之间的距离,扩大negative与anchor之间的距离。基于上述三元组,可以构建一个positive pair <a, p>和一个negative pair <a, n>。triplet loss的目的是在一定的margin上把positive pair和negative pair分开。
具体的做法是,针对vpr的情况,如下:
每个样本是一个[4, 16384]的向量,其中4是batchsize。对于每个16384的向量,它的来源是某一个地点的事件流。例如对于每个Anchor,与它距离超过10米的认为是positive的,而超过25的认为是negative。
这样就可以得到一系列三元组,我们把所有地点 和事件流 划分为query和database,对于每个query,将database中的事件流划分为positive和negative。很显然negative的数量会远大于positive,且它们都会有一定数量,这些都在dataset中预处理了,下述dataset在每次__getitem__的时候,获取的都是1个Anchor、1个positive和n_sample个negative。
1
2
3
4
5
6
7
8
9
10
11
12
13
14
15
16
17
18
19
20
21
22
23
24
25
26
27
28
29
30
31
32
33
34
35
36
37
38
39
40
41
42
43
44
45
46
47
48
49
50
51
52
53
54
55
56
57
58
59
60
61
class MVSEC_Single_Train_Dataset (torch.utils.data.Dataset): def __init__ (self, dtrain=2 , th_pos=10 , th_neg=25 , n_sample=10 ): super ().__init__() self.dtrain = dtrain self.th_pos, self.th_neg = th_pos, th_neg self.n_sample = n_sample self.query, self.db = self.get_xyt_list(dtrain) self.triplet_train_list = self.get_triplet_train() def __getitem__ (self, index ): triplet_train = self.triplet_train_list[index] x, y, timestamp = self.query[triplet_train[0 ]] anchor = np.load(Config.events_root + filenames[self.dtrain] + '/' + str (timestamp) + '.npy' ) e0pos = triplet_train[1 ] best_pos = np.random.choice(e0pos, size=1 , replace=False )[0 ] x, y, timestamp = self.db[best_pos] pos_env = np.load(Config.events_root + filenames[self.dtrain] + '/' + str (timestamp) + '.npy' ) e0neg = triplet_train[2 ] e0neg_selected = np.random.choice(e0neg, size=self.n_sample, replace=False ) neg_envs = [] for nega in e0neg_selected: neg_envs.append(np.load(Config.events_root + filenames[self.dtrain] + '/' + str (self.db[nega][2 ]) + '.npy' )) return events_to_voxel_grid(anchor), events_to_voxel_grid(pos_env), np.array([events_to_voxel_grid(nega) for nega in neg_envs]) def __len__ (self ): return len (self.query) def get_single_xyt (self, loc, ts_comb, count ): t_min, t_max = loc[0 , 2 ], loc[-1 , 2 ] idx_begin = np.argmax(ts_comb > t_min) idx_end = np.argmin(ts_comb < t_max) - 1 idx_selected = np.round (np.linspace(idx_begin, idx_end, count)).astype(int ) t_selected = ts_comb[idx_selected] new_x = np.interp(t_selected, loc[:, 2 ], loc[:, 0 ]) new_y = np.interp(t_selected, loc[:, 2 ], loc[:, 1 ]) xyt_comb = np.column_stack((new_x, new_y, t_selected)) return xyt_comb def get_xyt_list (self, dtrain ): loc = np.load(Config.gps_root + filenames[dtrain] + '.npy' ) ts_comb = get_calag_timestamps_sorted(dtrain) xyt_comb = self.get_single_xyt(loc, ts_comb, Config.subject_len[dtrain]) permuted = np.random.permutation(xyt_comb) query, database = permuted[:int (len (permuted)*0.3 )], permuted[int (len (permuted)*0.3 ):] return query, database def get_triplet_train (self ): triplet_train_list = [] for idx, (qx, qy, qt) in enumerate (tqdm.tqdm(self.query, ncols=50 )): tmp = (self.db[:, 0 ] - qx) ** 2 + (self.db[:, 1 ] - qy) ** 2 e0pos = np.where(tmp < self.th_pos)[0 ] e0neg = np.where(tmp > self.th_neg)[0 ] triplet_train_list.append([idx, e0pos, e0neg]) return triplet_train_list
在训练时,分别让anchor, pos, negs通过模型,得到向量后,计算它们的distan;优化器选择的是Adam,反正据说不确定的话选它就完事了()。
1
2
3
4
5
6
7
8
9
10
11
12
13
14
15
16
17
18
19
20
21
distan = torch.nn.TripletMarginWithDistanceLoss(margin=Config.margin, distance_function=cosine_distance) optim = torch.optim.Adam(params=discriptor.parameters(), lr=Config.lr) def train (train_loader, net, distan, optim, epoch ): net = net.train() losses = 0 for anchor, pos, negs in tqdm.tqdm(train_loader, ncols=50 ): loss = 0 optim.zero_grad() disc_anchor = net(anchor.to(Config.device)) with torch.no_grad(): disc_pos = net(pos.to(Config.device)) disc_negs_merged = net(negs_merged.to(Config.device)) for idx in range (disc_negs.shape[1 ]): loss += distan(disc_anchor, disc_pos, disc_negs[:, idx, :]) loss.backward() optim.step() losses += loss print ('Train Epoch: {}\t Loss: {} \t \n' .format (epoch, losses / len (train_loader))) return losses / len (train_loader)
TensorBoard 这种记录的工具还挺多,wandb也挺好用,不过需要联网。挺喜欢tensorboard的,直接pip装就好。启动tensorboard使用如下命令,logdir是SummaryWriter的参数。
1 tensorboard --port=8888 --logdir=${Config.log}
给一个使用的示例,附带学习率的变化
1
2
3
4
5
6
7
8
9
10
11
from torch.utils.tensorboard import SummaryWriterwriter = SummaryWriter(Config.log) scheduler = torch.optim.lr_scheduler.StepLR(optim, step_size=Config.lrStep, gamma=Config.lrGamma) for epoch in range (num_epochs): writer.add_scalar("loss" , loss, epoch) writer.add_scalar("lr" , scheduler.get_last_lr()[0 ], epoch) writer.add_scalars("recall" , tag_scalar_dict={ "recall_1" : acc1, "recall_5" : acc5, "recall_10" : acc10, }, global_step=epoch)
希望并不聪明的我科研之路一些顺利